このページはRocky Linux 9にElasticsearch 8.5をインストールして、最低限使えるようになるまでの手順を書いたメモ書きです。
Elasticsearchを使うようになって暫く経ちましたが、CentOS 7からRocky Linux 9に移行するタイミングで色々と躓いたのでしっかり残しておきます。
変更前、変更後の環境は下記で、CentOS上で作ったアプリもそのままじゃ移せなくて参りました😇
| ソフトウェア | 変更前 | 変更後 |
|---|---|---|
| OS | CentOS 7 | Rocky Linux 9 |
| Elasticsearch | 7.16.2 | 8.5.2 |
| Python | 3.9.9 | 3.11.0 |
| ElasticsearchPython | 7.16.0 | 8.5.3 |
目次
スポンサーリンク
Elasticsearch 8.5のインストール
まずはdnfでElasticsearchをセットアップ出来るように設定していきます。
# rpm --import https://artifacts.elastic.co/GPG-KEY-elasticsearch
# vi /etc/yum.repos.d/elasticsearch.repo
-----
[elasticsearch]
name=Elasticsearch repository for 8.x packages
baseurl=https://artifacts.elastic.co/packages/8.x/yum
gpgcheck=1
gpgkey=https://artifacts.elastic.co/GPG-KEY-elasticsearch
enabled=0
autorefresh=1
type=rpm-md
Elasticsearchはバージョンが変わると、利用しているプラグイン等のアップデート作業も発生するので、dnf updateで一緒にアップデートされないようにenabledは0のままにしておきます。
終わったらElasticsearch公式のリポジトリを指定してインストール。
インストールされると “Security autoconfiguration information” というメッセージが表示されますが、初期設定に必要なのでメモしておきましょう。
# dnf -y install --enablerepo=elasticsearch elasticsearch kibana
.
. ~ 省略 ~
.
--------------------------- Security autoconfiguration information ------------------------------

Authentication and authorization are enabled.
TLS for the transport and HTTP layers is enabled and configured.

The generated password for the elastic built-in superuser is : XAYN5-Df3WAk0Jps+w_O

If this node should join an existing cluster, you can reconfigure this with
'/usr/share/elasticsearch/bin/elasticsearch-reconfigure-node --enrollment-token <token-here>'
after creating an enrollment token on your existing cluster.

You can complete the following actions at any time:

Reset the password of the elastic built-in superuser with
'/usr/share/elasticsearch/bin/elasticsearch-reset-password -u elastic'.

Generate an enrollment token for Kibana instances with
 '/usr/share/elasticsearch/bin/elasticsearch-create-enrollment-token -s kibana'.

Generate an enrollment token for Elasticsearch nodes with
'/usr/share/elasticsearch/bin/elasticsearch-create-enrollment-token -s node'.
-------------------------------------------------------------------------------------------------
### NOT starting on installation, please execute the following statements to configure elasticsearch service to start automatically using systemd
 sudo systemctl daemon-reload
 sudo systemctl enable elasticsearch.service
### You can start elasticsearch service by executing
 sudo systemctl start elasticsearch.service
デフォルトで elastic という管理者アカウントが作成されそのパスワードが表示されます。
メモをする前にうっかりログを流してしまった場合は、下記コマンドでパスワードの再発行を行えばOKです。
# /usr/share/elasticsearch/bin/elasticsearch-reset-password -u elastic

This tool will reset the password of the [elastic] user to an autogenerated value.
The password will be printed in the console.
Please confirm that you would like to continue [y/N]y <= yで応答

Password for the [elastic] user successfully reset.
New value: nIt*3IUtYgsouSFisR3V <= 新しいパスワード
Elasticsearchのプラグインをインストール
Elasticsearchで日本語をインデックスするのに役立つプラグインをインストールします。
# /usr/share/elasticsearch/bin/elasticsearch-plugin install analysis-icu
# /usr/share/elasticsearch/bin/elasticsearch-plugin install analysis-kuromoji
リストに出てくればプラグインのインストールは完了です。
# /usr/share/elasticsearch/bin/elasticsearch-plugin list
analysis-icu
analysis-kuromoji
Elasticsearchのメモリ設定を変更
サーバの搭載メモリが少ない場合は、起動前にメモリの設定を変えておきます。
# vi /etc/elasticsearch/jvm.options
-----
################################################################
## IMPORTANT: JVM heap size
################################################################
##
## The heap size is automatically configured by Elasticsearch
## based on the available memory in your system and the roles
## each node is configured to fulfill. If specifying heap is
## required, it should be done through a file in jvm.options.d,
## which should be named with .options suffix, and the min and
## max should be set to the same value. For example, to set the
## heap to 4 GB, create a new file in the jvm.options.d
## directory containing these lines:
##
## -Xms4g
## -Xmx4g
##
## See https://www.elastic.co/guide/en/elasticsearch/reference/8.5/heap-size.html
## for more information
##
################################################################
-Xms2g <= 2GBに設定
-Xmx2g <= 2GBに設定
ElasticsearchとKibanaの起動
次にElasticsearchとKibanaを起動します。
Kibanaは無くてもElasticsearchは使えますが、GUIから操作出来ると何かと楽なので起動しておきます。起動はElasticsearch → Kibanaの順で。
# systemctl daemon-reload
# systemctl start elasticsearch
# systemctl start kibana
# systemctl enable elasticsearch kibana
curlコマンドを使ってElasticsearchに接続してみます。http_ca.crtへのアクセス権限が無いユーザーアカウントからやる場合は、sudoコマンドも併用しましょう。
管理者パスワードはインストール時に表示されたものを入力します。
# curl --cacert /etc/elasticsearch/certs/http_ca.crt -u elastic https://localhost:9200
Enter host password for user 'elastic': <= 管理者パスワードを入力
このような応答が返ってきたらOKです。
{
  "name" : "hostname",
  "cluster_name" : "elasticsearch",
  "cluster_uuid" : "4D7XdjG3QBmD3m6Y4H3Khg",
  "version" : {
    "number" : "8.5.3",
    "build_flavor" : "default",
    "build_type" : "rpm",
    "build_hash" : "kCR0WzFWqQtlJdea8rmol7404ccbed7d3ba9584e",
    "build_date" : "2022-12-05T18:22:22.226119656Z",
    "build_snapshot" : false,
    "lucene_version" : "9.4.2",
    "minimum_wire_compatibility_version" : "7.17.0",
    "minimum_index_compatibility_version" : "7.0.0"
  },
  "tagline" : "You Know, for Search"
}
Kibanaの初期設定
続いてKibanaのセットアップを行います。
Nginxを経由してKibanaへ接続する設定を追加
Kibanaは5601ポートでListenしているのでブラウザで直接繋いでも良いですが、Kibanaは運用後もちょくちょく利用するので、Let’s EncryptのSSL証明書を取得し、Nginxでこのように設定し使います。
これならファイヤーウォールに追加で穴を開ける必要も無いので楽かなと思います。
server {
	listen      80;
	server_name kibana.example.com;
	return 301 https://$host$request_uri;
}

server {
	listen      443 ssl http2;
	server_name kibana.example.com;

	access_log /home/kibana.example.com/log/nginx-access.log combined;
	error_log  /home/kibana.example.com/log/nginx-error.log warn;

	ssl_certificate     /etc/letsencrypt/live/kibana.example.com/fullchain.pem;
	ssl_certificate_key /etc/letsencrypt/live/kibana.example.com/privkey.pem;

	location / {
	        proxy_pass http://127.0.0.1:5601;
	}
}
ブラウザからKibanaの初期設定
Step1: Enrollment tokenの設定
ブラウザからKibanaへ接続するとこのようなページが表示されます。
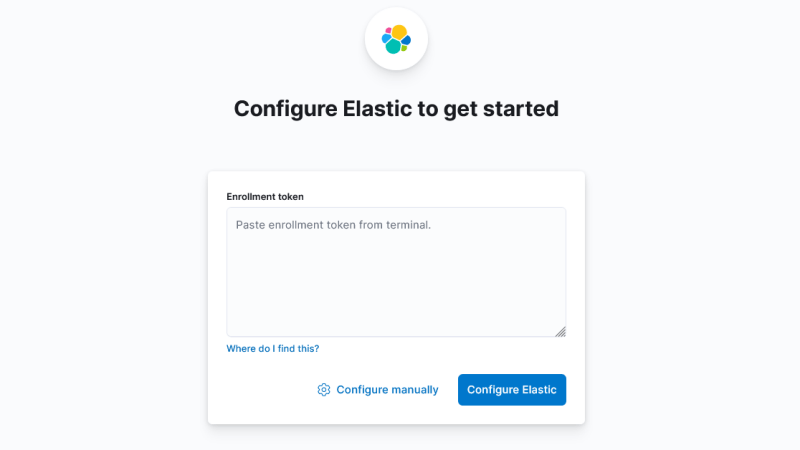
“Enrollment token” が必要なので下記コマンドで取得します。
# /usr/share/elasticsearch/bin/elasticsearch-create-enrollment-token -s kibana
eyJ2ZXIiOiI4LjUuMiIsImFkciI6WyIxNTcuNy4yMDAuMjQ4OjkyMDAiXSwiZmdyIjoiMjJmZGQ5NDIzODQ2M2M5Yzk2MjZhZTQxNjgzN2RlNTlmOWNjNTg3YTk5MWJlMDI2NjAxMDkwZmNhMWQ2YzhhNCIsImtleSI6IkhHb1k4b1FCMm9hQ3pEMVpic1BKOnVHT3YxbHFRUWpLdkFBcE5jUm5QdEEifQ==
Step2: コンフィグの自動作成
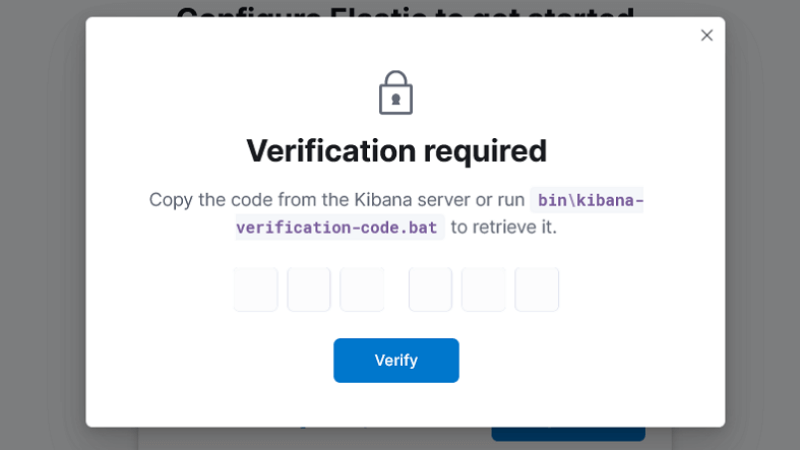
“Verification required” というフォームがポップアップされるので、下記コマンドで認証コードを取得しフォームに入力します。
# /usr/share/kibana/bin/kibana-verification-code
Your verification code is:  031 258
認証後は自動でKibana用の設定が設定ファイルに書き込まれ、終わるとログイン画面が表示されます。
設定ファイルは下記場所にあり、自動で設定される内容は末尾に追記されます。もしここでエラーが出る場合は書き込み権限絡みだと思うので、ログを確認しながら対処しましょう。
/etc/kibana/kibana.yml
無事初期設定が終わると、”Welcome to Elastic” という表示と共に、ユーザー名とパスワードを求められるのでユーザー名に “elastic”、パスワードは管理者パスワードでログインします。
これでKibanaの初期設定は完了です。お疲れ様でした。
Basic認証をかけているとエラーが出るので注意
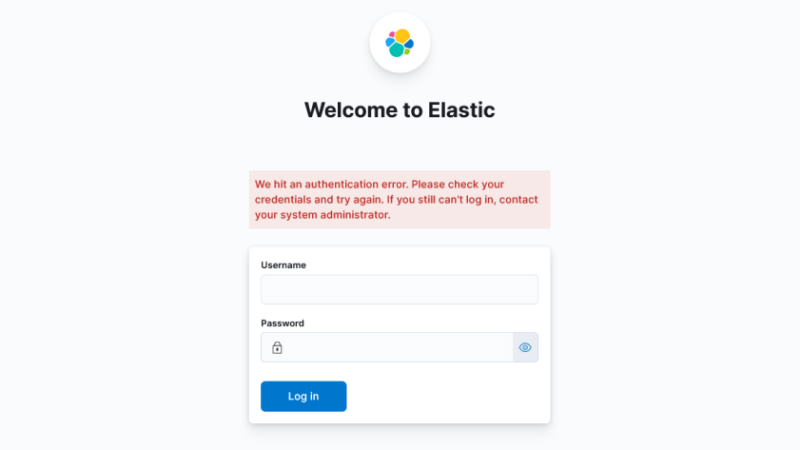
We hit an authentication error. Please check your credentials and try again. If you still can’t log in, contact your system administrator.
NginxのBasic認証でKibanaへのアクセスを制限しようとしたら、上記のようなエラーメッセージが表示されてログイン出来なくなりましたので合わせてメモを残しておきます。
ログを確認したらBasic認証で設定したユーザー名をKibanaに伝えようとして認証に失敗しているようでしたので、手っ取り早くBasic認証はかけずに運用するように誤魔化しました😇
Python Elasticsearchクライアントの変更点
バージョンアップによりPython Elasticsearchクライアントも使い方が少し変わりました。
Elasticsearch 7.16の時は外部から直接アクセスしないからという理由で、X-Packのセキュリティ機能は利用していませんでしたが、8.5はデフォルトでX-Packが有効になるのでこの機会にちゃんと運用する事にしました。
例えばmyindexというインデックスに接続する場合はこのようにPythonのElasticsearchクライアントを変更します。
7.16の場合
from elasticsearch import Elasticsearch

es = Elasticsearch()

query = {
	"query": {
		"match_all": {}
	}
}

res = es.search(index='myindex', body=query)
8.5の場合
from c import Elasticsearch

es = Elasticsearch(
	hosts=['https://localhost:9200'],
	basic_auth=('elastic', 'nIt*3IUtYgdouSFisR6V'),
	verify_certs=True,
	ssl_assert_fingerprint='22:FD:D9:42:38:46:3C:9C:96:26:AE:41:68:37:DE:59:F9:CC:58:7A:99:1B:E0:26:60:10:90:FC:A1:D6:C8:A4',
	request_timeout=10,
	http_compress=True
)

query = {
        "match_all": {}
}

res = es.search(index='myindex', query=query)
変更した部分は大きく下記になります。
- ElasticsearchにはHTTPSで接続
- 認証あり
接続時のセキュリティを気にしないであれば、このようにしてX-Packを無効化するとOKです。
# vi /etc/elasticsearch/elasticsearch.yml
-----
xpack.security.enabled: false
ローカル、LAN内で使う前提なら平文で問題ないですけど、変更後はKibana側の設定も調整が必要です。
また、PythonのElasticsearchクライアントの情報をネットで調べると、”http_auth(‘elastic’, ‘password’)” の記述が出てきますが、http_authは非推奨となり利用すると下記メッセージが表示されるようになりましたので注意しましょう。
/home/fern/work/py311/test.py:5: DeprecationWarning: The 'http_auth' parameter is deprecated. Use 'basic_auth' or 'bearer_auth' parameters instead
また証明書の指定はca_certsかssl_assert_fingerprintのオプションが利用出来ます。Elasticsearchの証明書は他のユーザーからだと参照出来ないので、プログラム内からだとフィンガープリントを使うのが簡単だと思います。
ca_certsを利用する場合は証明書の場所を指定、ssl_assert_fingerprintを利用する場合は下記コマンドでフィンガープリントを取得します。
# openssl x509 -fingerprint -sha256 -noout -in /etc/elasticsearch/certs/http_ca.crt
sha256 Fingerprint=22:FD:D9:42:38:46:3C:9C:96:26:AE:41:68:37:DE:59:F9:CC:58:7A:99:1B:E0:26:60:10:90:FC:A1:D6:C8:A4
最低限知っておきたい変更点としては以上かと思います。
CentOS7からのリプレイスでElasticsearchのアップデートも一緒にと思ったら、変更点が多くて運用中しているアプリの改修が大変そうです😑
以上、Elasticsearch 8.5のメモでした。