Rocky Linux 9に監視ツールのNagiosをインストールするメモ書きです。
監視ツールはZabbixやCacti辺りが有名かと思いますが、GUIじゃなく設定ファイルで手軽に監視したい場合は、Nagiosの方が個人的に使いやすくて好みです。
NagiosはDockerを使ってもいいですが、公開されているイメージだとグラフツールのNagiosgraphがエラーを吐いてちゃんと動かない🤔
という事で、久しぶりにソースからNagiosを構築する事にしました。監視サーバは一度作ったら滅多に作り直す事は無いですが、今回ハマったポイントが多かったのでちゃんと残しておこうと思います。
目次
スポンサーリンク
利用したOS・ソフトウェアのバージョン
今回は下記環境でNagiosサーバを構築しています。
- Rocky Linux 9.1
- Nninx 1.22.1
- PHP 8.1.14
- fcgiwrap 1.1.0-18
- Nagios 4.4.9
- nagios-plugins 2.4.2
- NRPE 4.1.0
Nagiosは本体の他に最低限プラグインが必要です。NRPEは監視エージェントでリモートサーバを監視したい時に使います。リソースグラフも描画したい場合はNagiosgraphが必要で、これに依存してRRDtoolやPerlモジュール等も必要になってきます。
Nagiosは他に色々とインストールしないといけないのが面倒なので、インストールに関してはZabbixの方が楽です。Zabbixは高機能なだけあって使い方を覚えるまでの学習コストが気になる所ですが、インフラ専業だったり大規模ネットワークの監視をしたい場合はZabbixなのかなと思います。
じゃあNagiosはって言うと、20台未満の小規模なネットワークで最低限の監視をしたいなら便利って思っています。
Nagiosのインストール
Nagiosはソースからインストールするので、以降は全てroot権限で操作します。
まずは専用のnagiosユーザーを作成し、WebのGUI操作に必要な権限をnginxユーザーに付与します。
# groupadd nagios
# useradd -d /usr/local/nagios -s /sbin/nologin -g nagios nagios
# usermod -G nagios nginx
NagiosのバージョンはGithubにある最新のものを基本利用しますが、Nagios関連のファイルはバグでインストールがつまずく場合もあるので、その時はバージョンを変えて試すと良いです。
本体のリリース一覧はこちらです → Github Nagios
# wget https://github.com/NagiosEnterprises/nagioscore/releases/download/nagios-4.4.9/nagios-4.4.9.tar.gz
# tar xfz nagios-4.4.9.tar.gz ; cd nagios-4.4.9
configureのオプションはこのように。
# ./configure \
--with-nagios-user=nagios \
--with-nagios-group=nagios \
--with-command-user=nagios \
--with-command-group=nagios

*** Configuration summary for nagios 4.4.9 2022-11-16 ***:

 General Options:
 -------------------------
        Nagios executable:  nagios
        Nagios user/group:  nagios,nagios
       Command user/group:  nagios,nagios
             Event Broker:  yes
        Install ${prefix}:  /usr/local/nagios
    Install ${includedir}:  /usr/local/nagios/include/nagios
                Lock file:  /run/nagios.lock
   Check result directory:  /usr/local/nagios/var/spool/checkresults
           Init directory:  /lib/systemd/system
  Apache conf.d directory:  /etc/httpd/conf.d
             Mail program:  /usr/bin/mail
                  Host OS:  linux-gnu
          IOBroker Method:  epoll

 Web Interface Options:
 ------------------------
                 HTML URL:  http://localhost/nagios/
                  CGI URL:  http://localhost/nagios/cgi-bin/
 Traceroute (used by WAP):


Review the options above for accuracy.  If they look okay,
type 'make all' to compile the main program and CGIs.
終わったらmakeです。
# make all

*** Compile finished ***

If the main program and CGIs compiled without any errors, you
can continue with testing or installing Nagios as follows (type
'make' without any arguments for a list of all possible options):

  make test
     - This runs the test suite

  make install
     - This installs the main program, CGIs, and HTML files

  make install-init
     - This installs the init script in /lib/systemd/system

  make install-daemoninit
     - This will initialize the init script
       in /lib/systemd/system

  make install-groups-users
     - This adds the users and groups if they do not exist

  make install-commandmode
     - This installs and configures permissions on the
       directory for holding the external command file

  make install-config
     - This installs *SAMPLE* config files in /usr/local/nagios/etc
       You'll have to modify these sample files before you can
       use Nagios.  Read the HTML documentation for more info
       on doing this.  Pay particular attention to the docs on
       object configuration files, as they determine what/how
       things get monitored!

  make install-webconf
     - This installs the Apache config file for the Nagios
       web interface

  make install-exfoliation
     - This installs the Exfoliation theme for the Nagios
       web interface

  make install-classicui
     - This installs the classic theme for the Nagios
       web interface

~ 省略 ~

Enjoy.
コンパイルが正常に終わると、インストールオプションが色々と表示されるので終わるまでメモしておきます。
必要なものをインストールしていきますが、今回は「本体、起動スクリプト、設定ファイル」をインストールします。commandmodeと言うのはNagiosのWeb GUIから操作するのに必要なオプションだったはず…
# make install
# make install-init
# make install-commandmode
# make install-config
# cd ..
起動スクリプト以外のファイルは “/usr/local/nagios” 以下に配置されます。
これで本体のインストールは完了です。
Nagiosプラグインのインストール
続いてNagiosプラグインをインストールします。
ソースはこちらで公開されています → Github Nagios Plugin
インストールの前に一部のプラグインで必要なものをdnfで入れておきます。
# dnf -y install net-snmp net-snmp-utils net-snmp-devel openssl-devel
終わったらソースをダウンロードしてプラグインをインストールします。
# wget https://github.com/nagios-plugins/nagios-plugins/releases/download/release-2.4.2/nagios-plugins-2.4.2.tar.gz
# tar xfz nagios-plugins-2.4.2.tar.gz ; cd nagios-plugins-2.4.2
# ./configure --with-nagios-user=nagios --with-nagios-group=nagios
# make all
# make install
# cd ..
makeまで終わるとpluginsというディレクトリ内に “check_XXX” という各種プラグインのファイルが出来ているので、インストール前に監視に利用したいプラグインが使える状態になっているかを確認しておくと良いでしょう。
最初にインストールしたSNMP関連はcheck_snmpというプラグインを使うのに必要で、これがないとインストールされません。SNMPは必須では無いものの、ネットワークトラフィックの計測に便利なのであった方が良いと思います。
Nagiosプラグインは “/usr/local/nagios/libexec” 以下に配置されます。
NRPE (check_nrpe) のインストール
Nagiosの監視エージェントにNRPEを使うので、Nagiosサーバに専用のプラグイン (check_nrpe) をインストールします。
NRPEもGithubから最新バージョンを取ってきてインストールします → Github NRPE
configureはこのようにしてmakeします。
# wget https://github.com/NagiosEnterprises/nrpe/releases/download/nrpe-4.1.0/nrpe-4.1.0.tar.gz
# tar xfz nrpe-4.1.0.tar.gz ; cd nrpe-4.1.0
# ./configure --enable-command-args

*** Configuration summary for nrpe 4.1.0 2022-07-18 ***:

 General Options:
 -------------------------
 NRPE port:    5666
 NRPE user:    nagios
 NRPE group:   nagios
 Nagios user:  nagios
 Nagios group: nagios

~ 省略 ~

# make all
終わったらcheck_nrpeのみをインストールします。
# make install-plugin
ファイルは “/usr/local/nagios/libexec/check_nrpe” に配置されます。
監視対象にNRPEをインストールする場合
Nagiosから監視したい対象サーバにインストールする場合はこのようにします。
# make install
# make install-init
# make install-config
起動スクリプト、本体、プラグイン、設定ファイルがインストールされます。
Nagiosインストール後の調整
ここまで完了したらインストール後の調整をします。
まずはWeb GUIへのアクセスにBasic認証を設定します。今回はIDにnagiosadminと任意のパスワードを設定します。
# htpasswd -c /usr/local/nagios/etc/htpasswd.users nagiosadmin
New password:
Re-type new password:
Adding password for user nagiosadmin
次にディレクトリの権限を変更します。
# chmod 755 /usr/local/nagios
# chown -R nagios:nagios /usr/local/nagios
そしてNagiosを起動します。
# systemctl enable nagios
# systemctl start nagios
# systemctl status nagios
statusでactive (running)になっていれば正常に起動出来ています。これでNgiosのインストールは完了です。
Nagiosgraphのインストール
次はグラフツールのNagiosgraphをインストールします。
NagiosのグラフツールはNagiosgraph以外にもありますが、長い事メンテナンスがされておらず今の環境だと動かないものもあるので、現状はNagiosgraph位しか選択肢が無いかもしれません…
という事で、Nagiosgraphをセットアップしていきますが、まずは依存ファイルをdnfで入れます。
# dnf -y install perl-rrdtool perl-GD perl-CGI perl-English
NagiosgraphのソースはGitコマンドでコピーします。
# git clone https://github.com/JasonRivers/nagiosgraph.git
# cd nagiosgraph
インストールスクリプトを実行して対話式で設定していきます。
基本はエンターを押して進めて行きますが、Nagiosのパスが正しく検出されない場合は手動で調整していきます。
# perl install.pl --prefix=/usr/local/nagiosgraph

Destination directory (prefix)? [/usr/local/nagiosgraph]
Location of configuration files (etc-dir)? [/usr/local/nagiosgraph/etc]
Location of executables? [/usr/local/nagiosgraph/bin]
Location of CGI scripts? [/usr/local/nagiosgraph/cgi]
Location of documentation (doc-dir)? [/usr/local/nagiosgraph/doc]
Location of examples? [/usr/local/nagiosgraph/examples]
Location of CSS and JavaScript files? [/usr/local/nagiosgraph/share]
Location of utilities? [/usr/local/nagiosgraph/util]
Location of state files (var-dir)? [/usr/local/nagiosgraph/var]
Location of RRD files? [/usr/local/nagiosgraph/var/rrd]
Location of log files (log-dir)? [/usr/local/nagiosgraph/var/log]
Path of log file? [/usr/local/nagiosgraph/var/log/nagiosgraph.log]
Path of CGI log file? [/usr/local/nagiosgraph/var/log/nagiosgraph-cgi.log]
Base URL? [/nagiosgraph]
URL of CGI scripts? [/nagiosgraph/cgi-bin]
URL of CSS file? [/nagiosgraph/nagiosgraph.css]
URL of JavaScript file? [/nagiosgraph/nagiosgraph.js]
URL of Nagios CGI scripts? [/nagios/cgi-bin]
Path of Nagios performance data file? [/tmp/perfdata.log] /usr/local/nagios/var/perfdata.log <= 調整
username or userid of Nagios user? [nagios]
username or userid of web server user? [www] nginx <= 調整
Modify the Nagios configuration? [n] y <= yで応答
Path of Nagios configuration file? [/usr/local/nagios/etc/nagios.cfg]
Path of Nagios commands file? [/usr/local/nagios/etc/objects/commands.cfg]
Modify the Apache configuration? [n]

configuration:
  ng_prefix            /usr/local/nagiosgraph
  ng_etc_dir           /usr/local/nagiosgraph/etc
  ng_bin_dir           /usr/local/nagiosgraph/bin
  ng_cgi_dir           /usr/local/nagiosgraph/cgi
  ng_doc_dir           /usr/local/nagiosgraph/doc
  ng_examples_dir      /usr/local/nagiosgraph/examples
  ng_www_dir           /usr/local/nagiosgraph/share
  ng_util_dir          /usr/local/nagiosgraph/util
  ng_var_dir           /usr/local/nagiosgraph/var
  ng_rrd_dir           /usr/local/nagiosgraph/var/rrd
  ng_log_dir           /usr/local/nagiosgraph/var/log
  ng_log_file          /usr/local/nagiosgraph/var/log/nagiosgraph.log
  ng_cgilog_file       /usr/local/nagiosgraph/var/log/nagiosgraph-cgi.log
  ng_url               /nagiosgraph
  ng_cgi_url           /nagiosgraph/cgi-bin
  ng_css_url           /nagiosgraph/nagiosgraph.css
  ng_js_url            /nagiosgraph/nagiosgraph.js
  nagios_cgi_url       /nagios/cgi-bin
  nagios_perfdata_file /usr/local/nagios/var/perfdata.log
  nagios_user          nagios
  www_user             nginx
  modify_nagios_config y
  nagios_config_file   /usr/local/nagios/etc/nagios.cfg
  nagios_commands_file /usr/local/nagios/etc/objects/commands.cfg
  modify_apache_config n
  apache_config_dir
  apache_config_file
Continue with this configuration? [y] <= エンターを押してインストール
ファイルは “/usr/local/nagiosgraph” 以下に配置されます。
nagiosgraphのディレクトリも権限を調整します。
# chown -R nagios:nagios /usr/local/nagiosgraph
# chmod 664 /usr/local/nagiosgraph/var/log/nagiosgraph-cgi.log
NagiosでNagiosgraphのリンクを表示する設定
上記のようにインストールすると、Nagiosgraphの設定がNagiosに自動で追加されますが、NagiosのGUIからグラフを確認出来た方が楽なのでNagiosgraphのリンクを追加する設定を行います。
まずはNagiosのテンプレートファイルに下記を追加します。
# vi /usr/local/nagios/etc/objects/templates.cfg

----- 追加 -----
define service {
	name		graphed-service
	action_url	/nagiosgraph/cgi-bin/show.cgi?host=$HOSTNAME$&service=$SERVICEDESC$' onMouseOver='showGraphPopup(this)' onMouseOut='hideGraphPopup()' rel='/nagiosgraph/cgi-bin/showgraph.cgi?host=$HOSTNAME$&service=$SERVICEDESC$&period=week&rrdopts=-w+450+-j
	register	0
}
次に、Nagiosgraphのリンクを追加したい箇所にこのように設定します。
# vi /usr/local/nagios/etc/objects/localhost.cfg

----------
define service {
	use						local-service,graphed-service ; <= graphed-serviceを追加
	host_name				localhost
	service_description		PING
	check_command			check_ping!100.0,20%!500.0,60%
}
グラフはNagiosプラグインの応答結果が対応しているかどうかで表示可能かどうか決まります。
ここでは細かく書きませんが、OK, Warning, Critical, Unknownという最低限の応答しか返さないプラグインだとグラフは表示されません。
Nagiosgrapの反映
設定が終わったらNagiosを再起動してNagiosgrapの設定を反映させます。
# /usr/local/nagios/bin/nagios -v /usr/local/nagios/etc/nagios.cfg
~ 省略 ~
Total Warnings: 0 <= Warnings, Errorsが出ない事を確認
Total Errors:   0

# systemctl restart nagios
NginxでNagiosを表示させる
次はNginxでNagiosを動かす設定をしていきます。
Nagiosの公式が提供するWeb用の設定ファイルはApache用だけなのですが、Apacheもmod_phpが無くなってからはお手軽さが無くなった気がするので、Nginxだけで動かす用に設定ファイルを作っていきます。
Nginxはphp-fpmとCGI用にfcgiwrapが必要なので適時構築します。Nginx + php-fpmはこんな風にいつもインストールしています。
fcgiwrapはこのようにインストールしました。
fcgiwrapのインストール
まずはdnfでインストールします。
# dnf -y install fcgiwrap
完了したらfcgiwrap.serviceとfcgiwrap.socketというファイルを作ります。
# vi /etc/systemd/system/fcgiwrap.service
-----
[Unit]
Description=Simple CGI Server
After=nss-user-lookup.target
Requires=fcgiwrap.socket

[Service]
EnvironmentFile=/etc/sysconfig/fcgiwrap
ExecStart=/usr/sbin/fcgiwrap ${DAEMON_OPTS} -c ${DAEMON_PROCS}
User=nginx
Group=nginx

[Install]
Also=fcgiwrap.socket
# vi /etc/systemd/system/fcgiwrap.socket
-----
[Unit]
Description=fcgiwrap Socket

[Socket]
ListenStream=/run/fcgiwrap.sock
SocketUser=nginx
SocketMode=0660

[Install]
WantedBy=sockets.target
終わったらfcgiwrapを起動します。
# systemctl enable fcgiwrap
# systemctl start fcgiwrap
# systemctl status fcgiwrap
Nginxの設定
Nginxの設定はこんな感じにしてみました。
SSLは必須だと思うので無料のLet’s Encryptで取得しておきます。
# vi /etc/nginx/conf.d/nagios.conf
-----
server {
	listen      80;
	server_name nagios.example.com;
	return 301 https://$host$request_uri;
}

server {
	listen      443 ssl http2;
	server_name nagios.example.com;
	root        /usr/local/nagios/share;
	index       index.php index.html;

	access_log  /var/log/nginx-nagios-access.log combined;
	error_log   /var/log/nginx-nagios-error.log warn;

	ssl_certificate     /etc/letsencrypt/live/nagios.example.com/fullchain.pem;
	ssl_certificate_key /etc/letsencrypt/live/nagios.example.com/privkey.pem;

	# Let’s Encrypt の更新用
	location ^~ /.well-known/acme-challenge/ {
		root /home/www/htdocs;
	}

	location = /.well-known/acme-challenge/ {
		return 404;
	}

	location / {

		auth_basic "Nagios Access";
		auth_basic_user_file /usr/local/nagios/etc/htpasswd.users;

		location /nagios {
			alias /usr/local/nagios/share;
		}

		location /nagiosgraph {
			alias /usr/local/nagiosgraph/share;
		}

		location ~ \.php$ {
			try_files     $uri = 404;
			fastcgi_index index.php;
			fastcgi_pass  unix:/var/run/php-fpm/php-fpm.sock;
			fastcgi_param SCRIPT_FILENAME $document_root$fastcgi_script_name;
			fastcgi_param AUTH_USER $remote_user;
			fastcgi_param REMOTE_USER $remote_user;
			include       fastcgi_params;
		}

		location /nagios/cgi-bin {
			set $cgi_root /usr/local/nagios/sbin;
			rewrite ^/nagios/cgi-bin/(.*)\.cgi /cgi-bin/$1.cgi last;
		}

		location /nagiosgraph/cgi-bin {
			set $cgi_root /usr/local/nagiosgraph/cgi;
			rewrite ^/nagiosgraph/cgi-bin/(.*)\.cgi /cgi-bin/$1.cgi last;
		}

		location /cgi-bin {
			internal;
			root          $cgi_root;
			rewrite       ^/cgi-bin/(.*) /$1 break;
			fastcgi_pass  unix:/var/run/fcgiwrap.sock;
			fastcgi_param SCRIPT_FILENAME $document_root$fastcgi_script_name;
			fastcgi_param AUTH_USER $remote_user;
			fastcgi_param REMOTE_USER $remote_user;
			include       fastcgi_params;
		}
	}
}
あとはこの nagios.conf をNginx本体のに読み込ませて適用します。
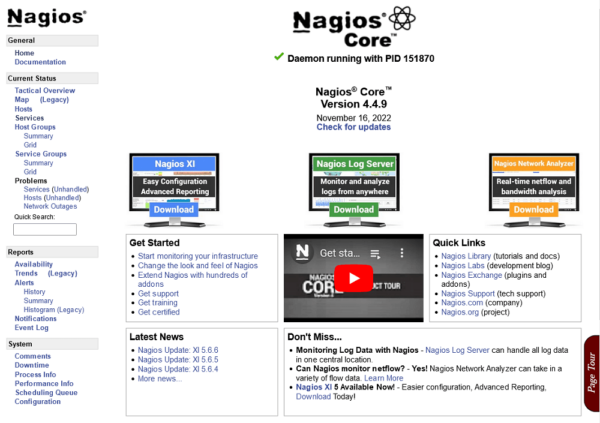
設定したURLにアクセスして下記のような画面が表示されたら完了です。
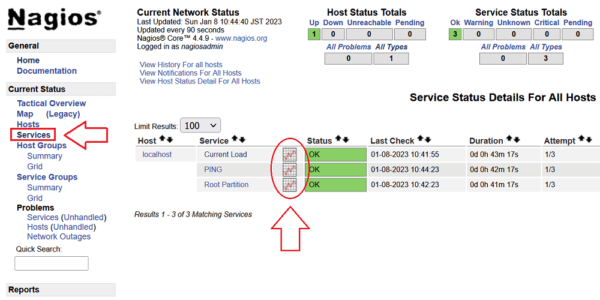
Nagiosgrapはこの位置から確認出来ます。
NagiosのPHP Warningを修正
動作には影響が無いですが、NagiosのトップページにアクセスするとこのようなPHP Warningがログに出るので一応修正しておきます。
2023/01/08 11:25:07 [error] 3250626#0: *15394 FastCGI sent in stderr: “PHP message: PHP Warning: Trying to access array offset on value of type bool in /usr/local/nagios/share/includes/utils.inc.php on line 217” while reading response…
2023/01/08 11:25:07 [error] 3250626#0: *15394 FastCGI sent in stderr: “PHP message: PHP Warning: Trying to access array offset on value of type bool in /usr/local/nagios/share/includes/utils.inc.php on line 217” while reading response…
2023/01/08 11:25:07 [error] 3250626#0: *15394 FastCGI sent in stderr: “PHP message: PHP Warning: Trying to access array offset on value of type bool in /usr/local/nagios/share/includes/utils.inc.php on line 154” while reading upstream,…
該当ファイルを開き、154と214行目を修正します。
# vi /usr/local/nagios/share/includes/utils.inc.php
----- 154, 214行目 -----
if(($fh=@fopen($fname,'r'))!=FALSE){
        // read all lines in the config file
        while(!feof($fh)){
                $s=fgets($fh);

                /* 追加 */
                // 対策: PHP Warning:  Trying to access array offset on value of type bool
                if (is_array($s) == false)
                       continue;
                /* ここまで */

                // skip comments
                if($s[0]=='#')
                        continue;
bool型の値を配列として参照しようとしているのが原因なので、配列じゃない場合に処理をスキップするように修正しました。
これでこの警告は表示されなくなります。
Nagiosgrapのエラーを修正
ここではNagiosgrap関連のエラーをまとめています。
修正しなくてもグラフ描画に問題ないかもしれないですが、グラフが表示されなかったりする場合はこの辺を疑ってみましょう。
nagiosgraph-cgi.logの書き込み権限不足によるエラー
上記手順ではこのエラーに対処していますが、配置される nagiosgraph-cgi.log の書き込み権限不足により下記エラーが表示されました。
2023/01/08 10:44:42 [error] 3250626#0: *14772 FastCGI sent in stderr: “Sun Jan 8 10:44:42 2023 show.cgi 3251851 critical Cannot write to ‘/usr/local/nagiosgraph/var/log/nagiosgraph-cgi.log’, using STDERR instead
CGI::param called in list context from /usr/local/nagiosgraph/etc/ngshared.pm line 234, this can lead to vulnerabilities. See the warning in “Fetching the value or values of a single named parameter” at /usr/share/perl5/vendor_perl/CGI.pm line 414.
このログはNginxユーザーから書き込めるようにする必要があるので、このようにして対処します。
# chmod 664 /usr/local/nagiosgraph/var/log/nagiosgraph-cgi.log
nagiosgraph_ja.confのエラー
翻訳ファイル nagiosgraph_ja.conf が見つからないというエラーも出ました。
Sat Jan 7 13:35:06 2023 show.cgi 95550 warn No translations for ‘ja’ (/usr/local/nagiosgraph/etc/nagiosgraph_ja.conf)
そもそも日本語対応のファイルは公式では用意されていないので自分で頑張って作るか、そうでなければ翻訳ファイルを探す処理をしないようにPerlモジュールを修正して対処します。
ngshared.pmの234行目付近をこのように修正します。
# vi /usr/local/nagiosgraph/etc/ngshared.pm
----- 234行目 -----
#$errmsg = readi18nfile($cgi->param('language'));
$errmsg = readi18nfile(0);
if ($errmsg ne q()) {
    debug(DBWRN, $errmsg);
}
language (ja) が指定されかつファイルが無いとこのエラーが出ますが、languageの値を渡さないとデフォルトの en が使われエラーが出なくなるっぽいです。
CGI::paramのエラーを消す
CGI::param() 絡みのエラーが出るのでこれを消すようにします。
2023/01/08 11:17:01 [error] 3250626#0: *15363 FastCGI sent in stderr: “CGI::param called in list context from /usr/local/nagiosgraph/etc/ngshared.pm line 385, this can lead to vulnerabilities. See the warning in “Fetching the value or values of a single named parameter” at /usr/share/perl5/vendor_perl/CGI.pm line 414″ while reading upstream,…
消すというか警告を無視するだけですが、脆弱性に繋がる使い方をしているため出ているエラーなので、本当なら修正するのが好ましいです。しかし、NagiosはBasic認証下で限られた人しか見ないから、手っ取り早く警告を無視する事にしました。
ngshared.pmの47行目付近に下記1行を追加します。
# vi /usr/local/nagiosgraph/etc/ngshared.pm
----- 47行目 -----
## 追加
$CGI::LIST_CONTEXT_WARN = 0;

$VERSION = '1.5.2';
$CFGNAME = 'nagiosgraph.conf';
これでNagiosgrap関連のエラーは出なくなりました。

