WordPress のテーマ TwentyFourteen のカスタマイズ記事です。
前回の記事で TwentyFourteen のヘッダー部分の色をカスタマイズしましたが、今回は下記図の「橙」で表示したメインウィジェットの部分のカスタマイズについて書きます。
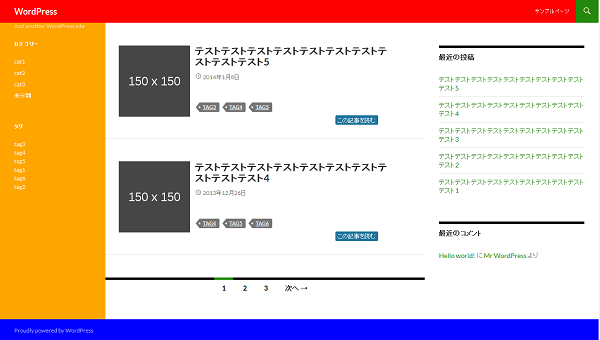
完成はこんな感じのイメージです。
PC 表示
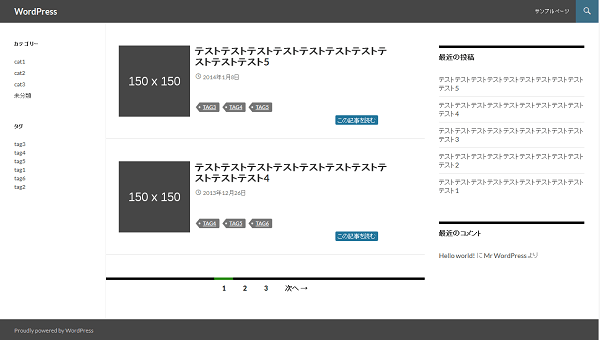
タブレット・SP 表示
※ フルサイズのスクリーンショットなのでサムネイルで表示 (width: 600px)
スポンサーリンク
TwentyFourteen メインウィジェット部分のカスタマイズ
スタイルシートは下記項番を編集します。
- 7.0 Sidebars
- 7.1 Widgets
- 7.2 Content Sidebar Widgets
- 11.0 Media Queries
7.0 Sidebars
1008px 以下で表示した場合のウィジェットの背景色をここで変更します。
#secondary {
	background-color: #000;
	border-top: 1px solid #000;
	border-bottom: 1px solid rgba(255, 255, 255, 0.2);
	clear: both;
	color: rgba(255, 255, 255, 0.7);
	margin-top: -1px;
	padding: 0 10px;
	position: relative;
	z-index: 2;
}
変更箇所。
2 行目 -> background-color: #3d6f86;
7.1 Widgets
1008px 以下で表示した場合のウィジェットの文字、ホバー字の色をここで変更します。
.widget a {
	color: #fff;
}

.widget a:hover {
	color: #41a62a;
}

・
・~省略~
・

.widget-title,
.widget-title a {
	color: #fff;
}

.widget-title a:hover {
	color: #41a62a;
}
変更箇所。
2 行目 -> color: #dcdcdc;
6 行目 -> color: #fff;
13-16 行目 -> 削除
19 行目 -> color: #21759b;
7.2 Content Sidebar Widgets
ここは右サイドウィジェットの部分ですが、ついでに文字とホバー時の色を変更しておきます。
.content-sidebar .widget a {
	color: #24890d;
}

.content-sidebar .widget a:hover {
	color: #41a62a;
}
変更箇所。
2 行目 -> color: #464646;
6 行目 -> color: #21759b;
11.0 Media Queries
最後は Media Queries で 1008px 以上で表示した場合のカスタマイズを行います。
@media screen and (min-width: 1008px) {
・
・~省略~
・
	.site:before {
		background-color: #000;
		content: "";
		display: block;
		height: 100%;
		min-height: 100%;
		position: absolute;
		top: 0;
		left: 0;
		width: 182px;
		z-index: 2;
	}
・
・~省略~
・
}
変更箇所。
6 行目 -> color: #fff;
同ルール内追加 -> border-right: 1px solid #f5f5f5;
更に、「@media screen and (min-width: 1008px)」内に下記ルールを追加します。
	.primary-sidebar .widget,
	.primary-sidebar .widget a {
		color: #464646;
	}

	.primary-sidebar .widget a:hover {
		color: #21759b;
	}
以上でメインウィジェット部分のカラーカスタマイズは完了です。
次回はフッダー (青) 部分について書きます。